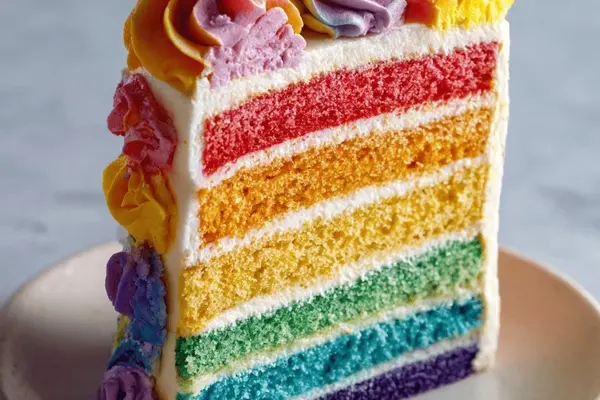
Rainbow Layer Cake with Buttercream Frosting
By Emma
Certified Culinary Professional
·
Recipe tested & approved
Make a stunning rainbow layer cake with olive oil, eggs, and buttercream frosting tinted in vibrant colors. This homemade recipe delivers moist layers and smooth decorating.
Prep:
1h 20min
Cook:
55 min
Total:
2h 15min
Servings:
12 servings
Trim the dome. That curved top is your enemy — steam trapped underneath, layers tilting when you stack them. Takes 30 seconds with a serrated knife. Worth it.
This is a homemade rainbow layer cake that actually works. Not the kind where food coloring bleeds everywhere or the buttercream splits halfway through. Two sturdy cake layers, proper aeration, enough frosting to make the rainbow bands actually look like something. 2 hours 15 minutes total. You’ll need patience on the whisking part — there’s a reason the eggs take 9 to 11 minutes.
Why You’ll Love This Homemade Rainbow Layer Cake
It’s straightforward vegetarian dessert. No weird egg replacements, no sketchy substitutions. Just eggs, flour, butter.
Layers stay stable when you stack them. The cake’s dense enough to hold frosting weight, tender enough that you can actually eat it without it being dry. Tried it once with cake flour. Too fragile. All-purpose is right.
Food coloring doesn’t bleed. Gel colors, not liquid. They’re thick. Mix them in properly and the bands stay where you put them.
Tastes good the next day. Actually tastes better. Buttercream firms up, flavors settle in. Pack it cold if you need to move it somewhere.
The whipping part takes time but that’s the whole thing. Air in the eggs, air in the butter. That’s what separates it from a dense brick.
What You Need for a Rainbow Layer Cake
Flour — 400 grams. All-purpose. Not cake flour unless you want it falling apart when you frost it. Baking powder, 18 milliliters. Salt, half a teaspoon.
Four large eggs. Room temperature. Cold eggs won’t whip properly no matter how long you beat them.
Sugar — 380 grams. Vanilla extract, a tablespoon. Light olive oil, 180 milliliters. The oil matters more here than you’d think. It keeps the cake tender without making it greasy. Whole milk, 320 milliliters. Or buttermilk if you want tang. Same amount either way.
Butter for frosting — 490 grams, softened. It has to be soft or you’ll be beating it forever. Icing sugar, 740 grams. Vanilla, a teaspoon and a half.
For the colors: cocoa powder for the red. Gel food coloring in red, purple, blue, green, yellow, orange. The small bottles. Liquid coloring won’t work — too watery, too much liquid in the frosting.
How to Make a Homemade Rainbow Layer Cake from Scratch
Oven to 175 Celsius. Middle rack. Grease two 20-centimeter springform pans and line them with parchment. The parchment matters. It pulls away clean instead of sticking to the bottom and ripping pieces off.
Whisk together flour, baking powder, salt. Sift it if it’s clumpy. Don’t skip this. Sets the base for a clean crumb.
Eggs and sugar in the big bowl. Whisk on high speed. This takes 9 to 11 minutes. Actually time it. The mixture should get pale, thick, ribbony when you lift the whisk — batter should trail off it like a thick ribbon and sit on the surface for a second before disappearing. That’s aeration. That’s what makes it light.
Oil goes in slow. Keep whisking but softer now. Too fast and it won’t blend properly. You’ll get greasy pockets that ruin texture. Stream it in while whisking, don’t dump it.
Dry ingredients and milk alternate. Spatula now instead of whisk — fold, don’t beat. Dry first, then milk, then dry, then milk, then dry. Start and end with flour. The batter should be smooth, pourable, thick but loose. Not stiff. Not runny.
Split the batter evenly between pans. Scale if you have one. Tap the pans on the counter to knock out air bubbles. They pop during baking and leave sinkholes.
Bake 52 to 58 minutes. Check at 50 minutes with a toothpick in the center. If wet batter comes out, keep checking every few minutes. When the toothpick has moist crumbs on it — not wet batter, actual crumbs — it’s done. The whole kitchen smells sweet and vanilla-heavy when it’s close.
Cool in the pans for 20 minutes. The edges need to firm up. Then run a knife around the sides, pop them out, peel the parchment off, and let them cool completely on a rack. Frosting warm cake will melt the frosting and make it gloopy. Wait.
How to Get the Frosting Right and Layers Stable
Butter goes in the mixer on medium speed. Beat it for 4 to 5 minutes until it’s pale and fluffy. Air in the butter is half the frosting.
Add vanilla, mix. Sift in half the icing sugar on low speed. Mix smooth. Add the rest of the icing sugar in stages — low speed, gradually. If it gets grainy or too stiff, add milk one teaspoon at a time. Should spread like butter, not like cement, and shouldn’t be runny.
Save about 1 liter of white frosting before you color anything. This matters. Too little and the colors turn watery and thin. Too much and you won’t have enough white left for the crumb coat.
Trim the cake tops with a serrated knife. Those domes trap steam and throw the stack off. Flat layers. Level. That’s stability.
Crumb coat goes on the first layer. 180 milliliters of white frosting spread thin across the top. Pop the second layer on top. Frosting the whole outside in white — not perfect, not smooth yet, just covered. Fridge for 20 to 30 minutes. The crumb coat locks the crumbs down. Then the colored frosting goes on without pulling cake apart.
Colors: red frosting gets cocoa powder mixed in with the red gel color. The cocoa deepens it into scarlet instead of flat pink. Stir it thoroughly. Gel colors are thick — they don’t mix like liquid. If the frosting gets stiff, add a tiny bit of milk or vanilla.
For the other colors, divide the remaining frosting into 5 bowls. About 150 milliliters each. Add one gel color to each bowl — purple, blue, green, yellow, orange. Stir each one until the color’s even.
Spread 125 milliliters of red frosting across the top of the cake. Smooth it or leave peaks. That’s your base.
Piping tip on the pastry bag — large round. Pipe a dot of red frosting at the cake’s edge to mark where you’re starting. Use a small spatula or the back of a teaspoon to press and smooth that dot horizontally about an inch around the cake. Pipe the next color, smooth it, repeat. Each band overlaps slightly so cake doesn’t show through.
Red, purple, blue, green, yellow, orange. Around and around. Slow turns of the cake help. Chill for at least 30 minutes before you cut into it.
Rainbow Cake Tips and Common Mistakes
Eggs have to be room temperature or they won’t whip. Cold eggs don’t aerate.
Underwhipped eggs means dense cake. Don’t skip the 9 to 11 minutes. The ribbon test is real.
Never use butter instead of oil in the batter. Butter solidifies and changes the whole texture.
Cake flour works but the layers get fragile. All-purpose holds the frosting weight better.
If batter looks too thick, add milk one tablespoon at a time. Fold gently.
If the cake browns too fast on top, tent it with foil halfway through.
Buttermilk works for the milk — adds tang, makes it slightly more tender.
Gel color stains everything. Dedicated spoons save time and mess.
Frosting grainy or split? Warm it in your hands, then whip it at medium speed.
If the crumb coat still shows crumbs after the fridge, put on a thin second one and chill again.
Color gels need actual mixing to be even. Don’t rush it.
Rainbow Layer Cake with Buttercream Frosting
Prep:
1h 20min
Cook:
55 min
Total:
2h 15min
Servings:
12 servings
Ingredients
- Cake
- 400 g (3 cups) unbleached all-purpose flour
- 18 ml (1 1/4 tbsp) baking powder
- 2.5 ml (1/2 tsp) salt
- 4 large eggs
- 380 g (1 3/4 cups) granulated sugar
- 15 ml (1 tbsp) vanilla extract
- 180 ml (3/4 cup) light olive oil
- 320 ml (1 1/3 cups) whole milk
- Buttercream
- 490 g (2 cups) unsalted butter, softened
- 7.5 ml (1 1/2 tsp) vanilla extract
- 740 g (6 cups) icing sugar
- 6 ml (1 tsp) cocoa powder
- 2.5 ml (1/2 tsp) red gel food coloring
- 0.5 ml (1/8 tsp) purple gel food coloring
- 0.5 ml (1/8 tsp) royal blue gel food coloring
- 0.5 ml (1/8 tsp) green gel food coloring
- 0.5 ml (1/8 tsp) lemon yellow gel food coloring
- 0.5 ml (1/8 tsp) orange gel food coloring
Method
- Cake
- 1 Preheat oven to 175 C (347 F). Position rack mid-oven. Grease and line two 20 cm springform pans with parchment. No shortcuts here: paper prevents crusts sticking and ensures even rise.
- 2 Whisk flour, baking powder, salt in medium bowl. Sift if clumpy. Sets base for muffin-like crumb that cuts clean. Ignore sifting? Denser layers, uneven pockets.
- 3 In large bowl, whisk eggs with sugar and vanilla on high speed for 9-11 min. Like whipping egg whites but with sugar - mixture grows, turns pale, thick enough to trail like ribbon off whisk. This aeration is non-negotiable or cake won’t be light. Past attempts flopped without this; patience pays.
- 4 Slowly stream in oil while whisking softly. Oil adds tenderness; olive oil keeps subtle fruity notes whereas canola’s neutral. Oil should blend completely; poor mixing leads to greasy pockets.
- 5 On low speed, alternate folding in dry ingredients with milk in 3 additions. Start and end with dry. Use spatula if needed at the end for homogeneity but avoid overmixing. Should be a smooth, pourable batter — thick but loose. Too stiff, layer gets dense; too runny, layers spread thin and pale.
- 6 Divide batter evenly between pans. Use a scale if available. Tap pans gently on counter to release any trapped air bubbles. Those pop and settle sinkholes that spoil texture.
- 7 Bake 52-58 minutes. Insert toothpick near center after 50 min; if wet batter sticks, keep checking every 3 min. When toothpick comes out with moist crumbs, not wet batter, cake is ready. Avoid overbaking; it dries edges out. Also smell: sweet vanilla wafts intensify near doneness.
- 8 Cool in pans on wire racks for 20 minutes. Edges will firm. Run a small knife around sides then unmold. Remove from pans, peel parchment and cool completely wire racks. Warm cake is unstable to frost, leads to gloopy frosting and crumbs embedding.
- Buttercream
- 9 Whip butter on medium speed until soft and pale, about 4-5 min. Air whipped butter makes difference. Add vanilla extract, mix. Gradually turn speed low and sift in half the icing sugar. Beat smooth and fluffy. Add remaining icing sugar in stages, gradually. Stop if mixture gets grainy or stiff; add 1 tsp milk to adjust texture — should be spreadable, pillowy, not runny or stiff. Skip milk? Frosting hard to spread, cracks.
- 10 Reserve 1 liter (4 cups) of white frosting for coloring. This is important. Too little, colors thin and watery; too much sets you back frosting entire cake.
- Assembly and Coloring
- 11 Trim dome tops off cakes with serrated knife. Those rounded caps trap steam and unbalance layers. Aim for level, flat layers; you want stack stability, clean cuts.
- 12 Spread about 180 ml (3/4 cup) white frosting evenly over top of one layer as crumb coat. Place second cake on top. Spread remaining white frosting to enclose entire cake, smoothing surface but don’t fuss over perfect finish yet. Chill fridge 20-30 min to firm up crumb coat. Crumbs locked, frosting layers solidified.
- 13 For red frosting, mix 250 ml (1 cup) reserved frosting with cocoa powder and red gel color. Cocoa deepens red into a richer scarlet, not flat pink. Mix thoroughly; gel colors dabble thick. If frosting too stiff, add vanilla essence or a touch milk. For other colors, divide remaining 740 ml (3 cups) frosting equally into 5 bowls (~150 ml each). Add purple, blue, green, yellow, orange gels individually, stir evenly. Don’t eyeball; color intensity driven by gel quantity and mixing thoroughness.
- 14 Apply 125 ml (1/2 cup) red frosting across top surface. Smooth or create textured peaks with spatula as base for rainbow.
- 15 Attach large round piping tip to pastry bag. Use red frosting to pipe a dot at base edge of cake marking start point.
- 16 Use small offset spatula or teaspoon to press and smooth dot horizontally ~2.5 cm (1 inch). Repeat piping and smoothing dots in sequence, moving around cake to create 6 distinct color bands horizontally.
- 17 Continue using colored frostings in order: purple, blue, green, yellow, orange, repeating dot-then-smooth technique. Each color band should overlap slightly to avoid cake showing through but not bleed into others. Slow turns of cake while working helps. Mistakes? Chill cake, scrape off frosting edges gently with warm metal spatula and redo.
- 18 Refrigerate assembled cake for at least 30 minutes before serving. Buttercream sets and flavors meld better after chill.
- Tips and Troubleshooting
- 19 Egg whisking is vital. Underwhipped eggs = dense cake. Use room temp eggs. Cold eggs slow aeration.
- 20 Flour swap? Cake flour, same weight, makes extra tender but less sturdy layers.
- 21 Milk substitution? Buttermilk or yogurt thins batter, more tang, tender crumb.
- 22 Oils swap: Never butter instead of oil here. Butter solidifies, changes texture.
- 23 Dough too thick? Add milk 1 tbsp at a time, fold gently.
- 24 If cake browns too fast, tent foil loosely halfway through baking.
- 25 Color gels can stain utensils—dedicated spoons or liner tips save time.
- 26 If frosting splits or grainy, warm with hands then whip at medium speed.
- 27 Room temp cake layers cold from fridge frosting sticks better; warming triggers softening but risk melting frosting layers.
- 28 If crumb coat shows crumbs after chilling, apply thin second crumb coat and chill again before colored frosting.
Nutritional information
Calories
480
Protein
6g
Carbs
60g
Fat
26g
Frequently Asked Questions About Rainbow Layer Cake
Can I make this cake ahead of time? Bake it a day or two before. Cool completely, wrap each layer individually in plastic, freeze if you want. Frost it the day you’re serving. Buttercream’s fine in the fridge for weeks.
What if I don’t have gel food coloring? Liquid coloring makes the frosting too thin and watery. Don’t bother. Order gel online or use what you have. The cake tastes the same without the rainbow — just frost it all white or one color.
Why does my cake sink in the middle? Oven’s too hot or you’re opening it too much. Also underbaking — if it’s not fully set, it collapses when it cools. Toothpick should have moist crumbs, not wet batter.
Can I use a different oil? Olive oil works because it’s light and stays tender. Avocado oil does too. Coconut oil changes the flavor. Vegetable or canola are fine but more neutral — you lose that subtle fruitiness olive oil adds.
How do I get clean frosting bands without colors bleeding? Chill the crumb coat properly. Gel colors mixed thoroughly. Don’t second-guess yourself while piping — smooth once, move on. If a band bleeds, chill the whole cake and gently scrape it off with a warm metal spatula.
Is this cake vegetarian? Yeah. No animal products except eggs and butter and milk in the frosting. It’s straightforward.
You’ll Love These Too
Explore all →
Red Wine Sautéed Vegetables with Pancetta
Grilled Chicken Thighs with Bell Peppers
Andes Mint Chocolate Cookies Recipe
Deviled Eggs Recipe with Crispy Bacon
Ginger Chutney Recipe with Fresh Grapes
Air Fryer Cauliflower with Tahini-Dijon Sauce
Spaghetti Caponata with Crispy Eggplant
Porcupine Meat Balls with Quinoa
Coconut Lime Scones Recipe with Coconut Cream

Crispy Chicken Croquettes with Cornstarch
Creamed Chipped Beef on Toast Recipe
Pitcher Paloma Remix with Yuzu & Grapefruit

Pumpkin Chicken Curry

Herbed Cheese Pull-Apart Bread Recipe
Dairy-Free Corn Crumble with Lemon Zest
Chunky Peanut Toffee Bark with Chocolate
Easy Weeknight Pizza Casserole
Instant Pot Halloween Deviled Eggs with Avocado
Brioche Cinnamon Bun Recipe with Caramel