Homemade Condensed Milk Recipe
By Emma
Certified Culinary Professional
·
Recipe tested & approved
Warm the milk and sugar low. Real low. That’s where it starts.
Why You’ll Love This Homemade Condensed Milk
Takes 40 minutes total. Most of that you’re just standing there watching it happen. No weird additives hiding in the ingredient list. Two things. That’s it. Tastes richer than the canned stuff. Brown sugar adds something the store version doesn’t have. Costs maybe a third what you’d pay. Works for any dessert that calls for condensed milk—coffee, flan, dulce de leche, whatever. One batch covers it. Lasts a month in the fridge if you’re not using it faster than that.
What You Need for Homemade Milk Condiment
Two cups of 2% milk. Not whole. Not skim. The 2% works better—pulls down easier. One cup light brown sugar. Regular sugar works. Brown sugar’s got more going on. That’s the whole list.
Heavy-bottomed pan. Matters more than you think. Cheap thin pans burn it. Wide pan actually speeds things up—more surface means faster evaporation. Heatproof jar or bowl for cooling. A spoon. That’s it. Don’t even think about whisks.
How to Make Homemade Condensed Milk from Scratch
Pour the milk in. Add the sugar. Turn heat low. Not medium-low. Low. Sugar needs time to dissolve or you’re stuck with graininess later and there’s no fixing that part.
Watch it. Don’t walk away. Tiny bubbles start breaking the surface—that’s the teasing simmer. You’re not looking for a rolling boil. You’re not looking for nothing happening either. That middle ground. That’s the target.
Once you hit that stage, raise the heat just slightly. Barely. The sound shifts from a gentle hiss to steady bubbling. You’ll hear the difference. That’s your cue.
Slow Simmered Condensed Milk Recipe—Technique That Matters
Now comes the waiting part. Simmer for 25 to 45 minutes. Time depends on your pan, your stove, how aggressive your simmer is. Mine usually takes 35.
Don’t stir. This is where people mess up. Once those bubbles start, stirring breaks the mix and it curdles. Just watch. Skim off any foam that forms—that’s the silent enemy. Foam ruins the smooth texture. Discard it. Don’t scrape the sides either. Sugar crystals hide along the edges and act like little traps that make everything grainy.
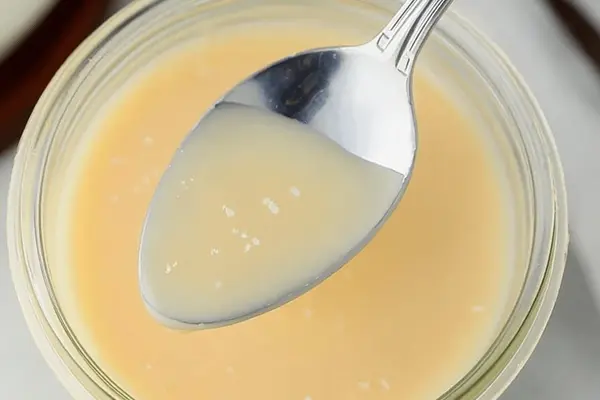
The color tells you what’s happening. Starts creamy ivory. Shifts toward pale caramel over time. That’s progress. The texture thickens but don’t expect it to be thick like the canned stuff yet. Cooling finishes the job. That’s not a shortcut—that’s how it actually works.
When the color looks right, pull it off the heat. Transfer to a heatproof jar or bowl. Let it cool all the way down to room temperature. Patience matters here. Texture develops while it cools. Rush this and it never gets as thick.
Homemade Condensed Milk Tips and Common Mistakes
Cover it. Stick it in the fridge for several hours or overnight. Thickens more. Flavors mature. If it’s sealed, lasts up to a month. No funky smells. No mold. Simple.
Grainy texture means sugar didn’t dissolve fully or you stirred during the bubbles. You can fix it. Gently reheat and skim the foam again. No stirring. That’s it.
Substitutions work sort of. Evaporated milk cuts the simmer time in half but the flavor’s less rich. Not as good. Honey adds depth but watch the burn risk at the simmer start—burns faster than sugar. Heavy-bottom pans spread heat even, cuts scorching chances. Use a wide pan. Shortens simmer time via surface evaporation.
Homemade Condensed Milk Recipe
Prep:
5 min
Cook:
35 min
Total:
40 min
Servings:
2 servings
Ingredients
- 2 cups whole milk altered to 2 cups 2% milk
- 1 cup granulated sugar changed to 1 cup light brown sugar for twist
Method
- 1 Warm milk and sugar in a heavy saucepan low heat. Slow and steady. Sugar must dissolve or risk grainy texture.
- 2 No stirring once large bubbles appear; tiny bubbles barely breaking the surface, teasing simmer stage.
- 3 Raise heat slightly to maintain mild simmer; no full boil. That sound shifts from gentle hiss to steady bubbling. Resist stirring or mix breaks, curdling risk.
- 4 Foam forms? Skim off gently, discard. Silent enemy for smooth texture. Avoid scraping sides—sugar crystals hide there, act like traps.
- 5 Simmer 25 to 45 minutes, watching milk reduce. Colors shift creamy ivory to pale caramel. Texture thickens but don't expect canned thickness now; cooling finishes job.
- 6 Remove from burner to cooler spot, transfer to heatproof jar or bowl. Let cool fully room temp. Patience here matters for texture development.
- 7 Cover, pop in fridge several hours or overnight. Thicken more, flavors mature. If sealed, lasts up to a month, no funky smells or mold.
- 8 Note: substituting evaporated milk cuts simmer time half but flavor less rich. Honey swap adds depth but watch burn risk at simmer start.
- 9 Pro tip: heavy-bottom pans spread heat evenly—cuts scorching chances. Avoid sharp quick stirs; risk curdle. Use wide pan to shorten simmer time via surface evaporation.
- 10 Troubleshoot if grainy: Likely sugar not fully dissolved or stirred during bubbles. Fix by gently reheating and skimming foam, no stirring.
Nutritional information
Calories
300
Protein
10g
Carbs
55g
Fat
8g
Frequently Asked Questions About Homemade Condensed Milk
Can you make condensed milk with whole milk and sugar without condensing it? Not really. The whole point is the condensing. That’s what makes it thick and sweet enough to work in recipes. You could use whole milk instead of 2%, but you’re still simmering it down.
How thick does homemade condensed milk get after it cools? Thicker than it looks in the pan. Still not canned-thick. Close enough for most things though. If you need it thicker, just simmer longer next time.
What’s the difference between using brown sugar vs. regular sugar? Brown sugar has molasses. Tastes different. Deeper. Regular sugar works but it’s more one-note. Brown’s better. Try both and see which you like.
Why does stirring ruin it? Breaks the emulsion or whatever science happens. Makes it grainy. Don’t stir once the bubbles start. Just don’t.
Can you use evaporated milk to make condensed milk? Yeah. Cuts simmer time to maybe 15 minutes. Flavor’s not as rich though. Tastes thinner somehow. Not worth it.
How long does homemade condensed milk actually last? Up to a month sealed in the fridge. Haven’t had it longer than that without using it. Probably fine longer. No mold or smell means it’s still good.
You’ll Love These Too
Explore all →
White Chocolate Cold Brew Coffee Recipe
Chocolate Marshmallow Roll Recipe

Grilled Chicken Tzatziki Pita with Cucumber

Gyro Sauce Recipe with Chickpeas

Eggplant S with Crispy Tofu & Green Beans

Zucchini Dip with Feta and Roasted Garlic

Silken Tofu Peanut Bowl with Vermicelli

Herbed Spicy Olive Dip with Fresh Garlic

Buttermilk Biscuits Recipe with Flaky Layers

Gazpacho Recipe with Yellow Peppers & Cucumber
Buttermilk Pie with Cinnamon Streusel

Almond Pizzelle Recipe with Lemon Zest

Baked Cabbage and Bacon with Cheddar

Caramelized Onion Pan Pizza with Mozzarella

Buckwheat Banana Muffins with Dark Chocolate

Roast Turkey with Spiced Herb Butter

Slow Cooker Turkey Breast with Herb Butter

Herb Butter Toast Cubes with Tarragon

Bacon Wrapped Scallops with Paprika
