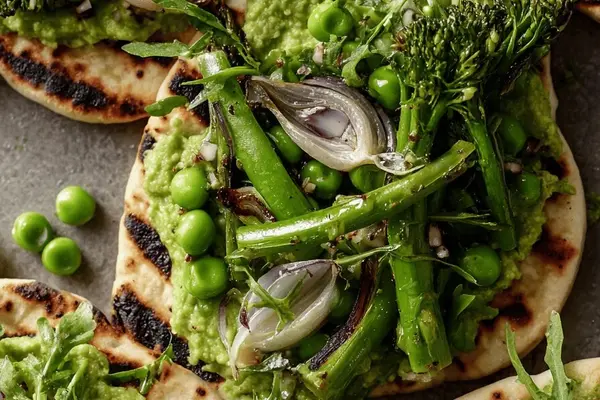
Grilled Pitas with Pea Puree & Green Veggies
By Emma
Certified Culinary Professional
·
Recipe tested & approved
Grilled pita bites topped with creamy pea puree, sautéed broccolini, snap peas, and shallots. Lemon and olive oil brighten this vegetarian appetizer. Serves 32 pieces.
Prep:
25 min
Cook:
12 min
Total:
37 min
Servings:
32 bites
Three pitas. Two green things that shouldn’t work together but do. Fifteen minutes of actual work and somehow you end up with something that tastes like you spent way longer on it than you did.
Why You’ll Love These Grilled Pita Appetizers
Takes 37 minutes total—25 to prep, 12 to cook. Most of that is just chopping. Works as the main thing at a party or the side nobody expected to be good. People ask for the recipe. Vegetarian. Actually tastes like food, not a compromise. The pea puree is weirdly addictive. Not sure why. Just is. Stays warm long enough to serve while you’re still grilling other stuff, but cold the next day is fine too.
What You Need for Grilled Pitas with Green Vegetable Topping
Pea puree base: 180 ml frozen peas (thawed, drained), 45 ml olive oil, 5 ml maple syrup—not honey, maple dissolves better—10 ml lemon juice, salt, pepper. Texture matters. Slightly grainy. Not baby food.
Warm green veggie salad: 200 ml broccolini (chopped into 2.5 cm pieces), 200 ml snap peas (halved), one small shallot (thinly sliced), 45 ml light olive oil, one small garlic clove (minced), 15 ml lemon juice, optional red pepper flakes, 375 ml baby arugula. Fresh arugula. Not the sad bag from three days ago.
Pitas: Three whole wheat. Brush with olive oil before grilling.
How to Make the Pea Puree and Green Veggie Salad
Food processor. Peas, oil, maple syrup, lemon juice. Blitz until smooth but still has some texture—not glop. Taste it. If it tastes flat, add more lemon. A half teaspoon at a time. Set it aside.
Heat olive oil in a wide pan over medium-high. Shallots first. Stir constantly. Around 2 minutes until they go translucent and smell like something. Not brown. Just soft.
Add broccolini and snap peas. Keep stirring. You’re listening for gentle sizzling—not violent popping and cracking. When the broccolini starts to actually bend but still snaps in half, maybe 5 or 6 minutes, add the garlic and red pepper flakes if you’re using them. Stir hard for one minute. Garlic burns stupid fast.
Squeeze lemon juice in. Salt. Pepper. Then here’s the move—pull it off heat and fold in the arugula fast. The hot pan wilts it just enough. Not slimy. Not raw. Just soft and peppery.
How to Get Grilled Pitas with Lemon Pea Spread Crispy and Perfect
Brush both sides of pitas with olive oil while the veggies are going. Don’t soak them. Just a coat.
Cast iron or ridged grill pan over medium-high. When it’s actually hot—like, you can hold your hand near it for maybe 2 seconds—lay pitas down. Wait. Don’t touch them. Around 2 to 3 minutes and you’ll see golden grill marks and the pita puffing up slightly. Flip once. Same thing on the other side. Don’t press down on them or they get dense and soggy. Don’t let the edges char to black.
Spread pea puree on warm pitas while they’re still hot. Not thin. Actually cover it. Top with warm veggie salad. The warmth helps everything stick together instead of sliding off your plate.
Cut into triangles or squares while still warm. Serve warm or room temperature. Cold doesn’t work great—everything gets dense.
Grilled Pita Appetizers Tips and Common Mistakes
Broccolini mushy? You waited too long. Vivid green and a little snappy when you bite is the target. Test before you add garlic.
Puree too thick, texture like cement? Add water or vegetable broth. A teaspoon at a time. Thin and watery? Add more peas or a handful of baby spinach—keeps the color right and thickens it back up.
Don’t press the pitas while they grill. Just lay them down and walk away for 2 minutes. They’re not burgers.
Arugula goes limp fast. Add it last. Right when you pull heat off. Fresh and peppery is the whole point.
Garlic at the end of cooking. Not the beginning. Beginning means bitter and angry. End of cooking means bright and alive in the finished salad.
Storing this? Keep puree and veggies separate. Mix them right before serving or right before you reheat. Warm veggies gently in a pan with a splash of olive oil instead of microwaving—tastes way better.
Snap peas gone? Green beans work. Shallot too strong? Use less. White part only, not the greens. Arugula not available? Baby spinach works but watch the heat—it gets mushy faster.
Grilled Pitas with Pea Puree & Green Veggies
Prep:
25 min
Cook:
12 min
Total:
37 min
Servings:
32 bites
Ingredients
- Green Pea Puree
- 180 ml (3/4 cup) frozen peas, thawed
- 45 ml (3 tbsp) olive oil
- 5 ml (1 tsp) maple syrup
- 10 ml (2 tsp) lemon juice
- Salt and freshly ground pepper
- Warm Green Veggie Salad
- 200 ml (3/4 cup plus 1 tbsp) broccolini, chopped into 2.5 cm pieces
- 200 ml (3/4 cup plus 1 tbsp) snap peas, trimmed and halved
- 1 small shallot, finely sliced
- 45 ml (3 tbsp) light olive oil
- 1 small clove garlic, minced
- 15 ml (1 tbsp) lemon juice
- Pinch red pepper flakes (optional)
- 375 ml (1 1/2 cups) baby arugula
- 3 whole whole wheat pitas
- Olive oil for brushing
Method
- Green Pea Puree
- 1 Blitz peas, olive oil, maple syrup, and lemon juice in a food processor until smooth but slightly textured. Season with salt and pepper. Pause for taste; add more lemon if it feels dull. Set aside. The texture should remain a bit grainy to avoid being mushy.
- Warm Green Veggie Salad
- 2 Heat olive oil over medium-high in a wide pan. Toss in shallots first, stir often till translucent and fragrant but not brown—around 2 minutes. Add broccolini and snap peas; stir frequently. Listen for gentle sizzling—not furious frying.
- 3 When broccolini starts to soften (a little bend but still snap), about 5-6 minutes, add garlic and a pinch of red pepper flakes if using. Stir constantly to avoid burning the garlic, about one minute only—aromas will pop.
- 4 Splash in lemon juice, season with salt and pepper. Off heat, fold in arugula quickly—the residual heat wilts it just the right amount without turning slimy. Set mixture aside to warm but not hot.
- 5 While veggies cook, brush pitas lightly with olive oil on both sides. Grill in a cast iron or ridged pan over medium-high heat. Flip once you see golden grill marks and pita puffs slightly, around 2-3 minutes each side. Avoid charring edges.
- 6 Spread the pea puree evenly over warm pitas. Top with warm veggie salad. Cut into triangles or squares while still warm to keep filling from slipping.
- 7 Serve room temperature or slightly warm; bites won’t hold well cold. Leftovers best gently reheated in oven to revive crisp.
- Substitutions and Tips
- 8 Broccolini can be swapped with tender broccoli florets or green beans. Snap peas replaced with green beans if needed. Maple syrup works better than honey here because it’s vegan and blends more subtly with lemon. If no arugula, baby spinach works but watch the wilting time—it’s more delicate.
- 9 Puree too thick? Thin with a little water or vegetable broth, a teaspoon at a time. Too thin? Add more peas or a small handful of baby spinach for color and body.
- 10 Overcooked veggies get mushy and lose peppery snap. Watch for vivid green color and test bite for resistant crunch before garlic addition.
- 11 Grilling pitas on direct heat crisps them fast; avoid pressing down or they get soggy. If grill pan not available, dry nonstick skillet with oil works but less char.
- 12 Wipe grill pan between batches if bits stick and smoke to prevent bitterness.
- 13 Arugula must be fresh and peppery; wilting is quick, add last thing. Can swap lemon juice for yuzu or lime for twist. Garlic is powerful; add at the end of cooking to preserve brightness.
- 14 Storing? Veggies and puree best kept separate to avoid sogginess; reheat veggies gently in pan with splash olive oil.
- 15 If pressed for time or texture, frozen thawed peas can substitute fresh in puree for speed but drain well to avoid watery puree.
Nutritional information
Calories
85
Protein
3g
Carbs
7g
Fat
6g
Frequently Asked Questions About Grilled Pita Appetizers
Can I make the pea puree ahead of time? Yeah. Make it hours before. Just cover it so it doesn’t dry out or pick up weird fridge smells. Stir it right before serving. If it’s thick from sitting, add a splash of water.
What if I don’t have a grill pan or cast iron? Regular nonstick with oil works. You won’t get char marks but the pitas still puff and crisp. Just watch heat so the oil doesn’t smoke.
Can I use fresh peas instead of frozen? Probably. Drain them really well though. Wet peas make watery puree and the whole thing falls apart. Fresh is maybe slightly nicer but frozen thawed works fine.
How do I know when the veggies are done? Color. Bright green. Not olive. And texture—snap peas snap, broccolini bends but doesn’t fold in half. Bite one. You’ll feel it.
Can these sit out at a party? For maybe 30 minutes they’re fine. After that the pitas get soft and everything starts sliding. Better to assemble right before you serve or right before your guests show up.
Is maple syrup really better than honey in the pea puree? Yes. It dissolves into the puree instead of staying grainy. And it’s vegan if that matters. Honey works if you have to but it’s not the same.
You’ll Love These Too
Explore all →
Peanut Butter Muffins with Chocolate Chips
Spatchcock Grilled Chicken with Pesto Mayo
Zucchini Lime Muffins with Oat Flour
Strawberry Short Cake with Mascarpone
Corn Salad with Smoked Cheddar

Crispy Skillet Beef Tacos with Tangy Sauce
Honey Jalapeño Cornbread with Butter
Hamburger Steaks with Onion Gravy
Homemade Cinnamon Rolls with Honey Caramel
Keto Spicy Bacon Chili with Ground Beef

Chocolate Chip Cookie Recipe with Cinnamon

Vanilla Bean Gelato Recipe with Heavy Cream
Cheesy Macaroni Recipe with Sweet Potato
Braised Pork Chops with Beer and Cabbage
No Bake Pumpkin Cheesecake Recipe

Chocolate Brownies with Espresso and Mini Chips

Sausage Egg Cheese Crescent Rolls
Bean Pinto with Garlic, Cumin & Cheddar
Green Tahini Yogurt Sauce with Parsley