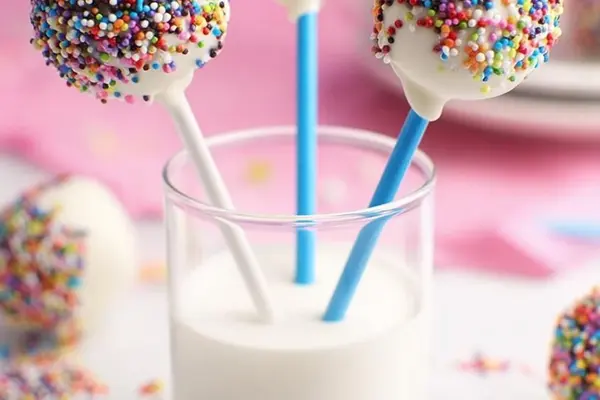
Donut Hole Cake Pops with Chocolate
By Emma
Certified Culinary Professional
·
Recipe tested & approved
Donut holes. Chocolate coating. Sticks. That’s it. Had a party two weeks ago and grabbed a box of store-bought holes because the bakery line was insane. Dipped them on a whim. People ate them faster than I could decorate them.
Why You’ll Love This
No oven needed. Just chocolate, sticks, and 20 minutes of your time. Perfect for parties—they disappear before you even finish setting up the dessert table.
Looks fancy but tastes like eating a chocolate-covered donut. Which it is. Kids lose their minds for these.
One bowl. One pot of melted chocolate. Cleanup is basically nothing.
What You Need for Chocolate-Covered Donut Holes
Donut holes. Eighteen of them. Store-bought is fine. Homemade works too. Room temperature is better than frozen—frozen ones sweat when the chocolate hits them.
Chocolate wafers or candy melts. Dark, milk, white—whatever you want. Wafers melt smoother than chips. About a cup and a half. Chocolate should flow freely when melted, not clump.
Treat sticks or lollipop sticks. Sturdy ones. Flimsy sticks bend when you push them in.
Sprinkles or coarse sugar if you want them. Optional but they look good. Colored melts for drizzle if you’re feeling it—another quarter cup.
That’s the whole list.
How to Coat and Decorate Donut Hole Cake Pops
Start by rolling each donut hole between your palms a few times. Seals the cracks. Keeps chocolate from seeping inside. Don’t squeeze hard. Just enough so it’s compact and smooth. A few seconds per hole.
Get your chocolate ready. Double boiler works. Water simmering, bowl on top, stir constantly. Microwave works too—20-second bursts, stir hard between bursts. Chocolate burns fast. It should look glossy and flow like warm syrup. No graininess. No lumps.
Dip the tip of each stick into chocolate first. This matters more than it sounds. The chocolate anchor keeps your stick from spinning when you push it in. Push the stick straight into the center of the donut hole. Firm but not violent. Let it sit in the chocolate for a second. Then set it down in a holder—styrofoam block, cake pop stand, whatever you have. Let it dry completely. This takes like 10 minutes.
Once sticks are locked in and dry, dip the whole thing. Hold the stick upside down, lower the donut hole into melted chocolate. Hold it there for about 50 seconds. The chocolate cools fast. Let excess drip off. Look for an even coat with no bare spots. Streaky coat means your chocolate is too thick—warm it a few seconds and try again. Set it upright in your stand.
Sprinkles go on while the coating is still shiny but not wet. Not dripping. That tacky stage. Roll it in sprinkles or sprinkle by hand. Light pressure—make them stick but don’t bury the pop.
Drizzle comes after everything dries. At least 15 minutes at room temp. Melt your second color. Snip a tiny hole in a plastic bag corner or use a piping bag. Drizzle lines or patterns. Add more sprinkles over the drizzle if you want texture. Let everything dry again before stacking or storing.
Fixes and What Goes Wrong
Sticks slip out when you’re coating. Remelt the chocolate anchor. Push the stick back in. Hold it for a few extra seconds. Let it fully dry this time.
Chocolate gets thick fast. Stir it gently before each dip. If it gets too stiff, add a teaspoon of coconut oil. Stir. Let it thin out. Don’t overheat trying to fix it.
Frozen donut holes sweat under warm chocolate. Condensation. Use room temperature holes or pull them from the fridge right before you start. Makes a difference.
Chocolate coating looks streaky or lumpy. It’s too thick or cooling too fast. Warm it up. The chocolate should flow like syrup, not like paste.
Storage matters. Keep them upright in an airtight container. Room temp or fridge. Before you serve them, let them sit at room temp for 10 minutes. Brings them out of the fridge and prevents that wet look from condensation.
Donut Hole Cake Pops with Chocolate
Prep:
20 min
Cook:
10 min
Total:
30 min
Servings:
18 servings
Ingredients
- 18 donut holes, store-bought or homemade
- 1 1/2 cups chocolate wafers or candy melts (dark, milk, or white)
- 18 treat sticks or sturdy lollipop sticks
- Sprinkles or coarse sugar for decoration, optional
- Additional 1/4 cup white chocolate or colored candy melts for drizzle (optional)
Method
- 1 Start by rolling each donut hole between your palms. This isn’t just for looks. Sealing cracks reduces chocolate seeping inside and gives a cleaner coat. Don’t overwork; you want a rounded, slightly compact ball that bounces back when pressed lightly.
- 2 Set up a double boiler: simmer water, place heatproof bowl on top, stirring chocolate wafers constantly. Or microwave in bursts of 20 seconds, stirring well in between to prevent scorching. Chocolate should be smooth, glossy, and flowing freely - no graininess.
- 3 Dip a treat stick into melted chocolate first. This tiny chocolate anchor keeps your stick secure when inserted into the donut hole. Hold stick then push gently but firmly into the center of each donut ball. Let the chocolate dry completely before moving on — set stand or styrofoam block works well here.
- 4 Once sticks are anchored and dry, dip the entire cake pop into melted chocolate. Hold upside down for about 50 seconds, letting excess drip off. Look for a smooth, even coat with no bare spots or lumps. If your coating is streaky or thick, warm it slightly to thin out. Transfer to cake pop stand upright.
- 5 For sprinkles: while coating is still tacky but not wet (think shiny but not dripping), roll or sprinkle your toppings over. Press lightly to help stick but don’t smother. If you want drizzle, let pops dry fully—minimum 15 minutes at room temp. Melt second color, snip tiny hole in piping bag or plastic bag corner, drizzle in pattern. Add sprinkles over drizzle while still tacky if you like extra texture.
- 6 Troubleshooting: If sticks slip out, remelt chocolate and re-anchor with extra coating. Chocolate thickens fast; stir gently before each dip, add a little coconut oil to thin if needed. Frozen donut holes sweat—use room temp or cool fridge to avoid sogginess.
- 7 Store finished pops upright at room temp or fridge in airtight container. Condensation ruins smooth finish—bring to room temp before serving to avoid sweating.
Nutritional information
Calories
120
Protein
1g
Carbs
15g
Fat
7g
Frequently Asked Questions
Can you make these ahead of time? Yeah. They keep for days in an airtight container. Room temp or fridge. Just let them warm up a bit before serving so they don’t look sweaty.
What if the chocolate won’t drip off the stick? It’s too thick. Warm it up a couple seconds in the microwave. Stir in a tiny bit of coconut oil. Should flow better. If it’s just barely dripping, hold it upside down a few extra seconds and let gravity do the work.
Can you use homemade donut holes? Sure. Let them cool completely first. Room temp. Cold ones sweat when hot chocolate hits them. Everything else is the same.
How long do these take to dry completely? Basic coating dries in 10 minutes or so. Everything—coating, sprinkles, drizzle—needs at least 15 minutes before you move them around. Patient is better. Thirty minutes and you’re totally safe.
What if your chocolate gets too grainy? It got too hot. That’s the only reason. Throw it out and start over. Chocolate doesn’t fix once it’s grainy. Prevention: never let it get above medium heat and stir constantly. Bursts of time are your friend.
Can you skip the stick and make these a different way? Yeah but then they’re just chocolate-covered donut holes, not cake pops. Both are fine. Stick version looks better at parties and doesn’t require a fork. Up to you.
You’ll Love These Too
Explore all →
Air Fryer Quiche with Bacon and Kale
Maple Blueberry Pavlova with Crispy Meringue
Cheesecake Almond Cookies with Candied Cherry

Chicken Stir Fry Rice Noodles with Sesame

Mediterranean Lamb Leg Roast with Harissa
Rabbit with Pancetta and Mushrooms
Chicken Cheese Ball with Pecans & Ranch
Pork Tenderloin Marinade with Tamarind
Pumpkin For Pie: Spiced Cake With Filling
Eggless Macaroons with Coconut Yogurt
Mini Cheesecake Cupcakes with Lemon Frosting
Cream Cheese Carrot Dip with Cinnamon
Shrimp Stir Fry with Bell Peppers
Blueberry Danish with Cream Cheese & Lemon
Red Cabbage Apple Salad with Fennel
Maple Pork Belly Tart with Herb Crust

Mediterranean Chicken Crescents with Feta
Air Fryer Tofu Sandwich with Vegan Cheddar
Chai Tea Recipe with Coconut Milk