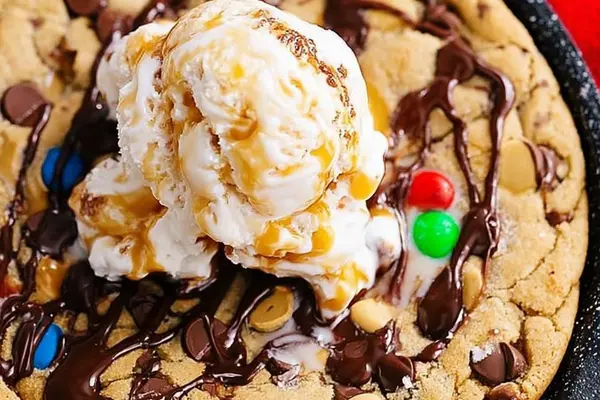
Cookie In Iron Skillet With Chocolate Chips
By Emma
Certified Culinary Professional
·
Recipe tested & approved
Chewy cookie in iron skillet with chocolate chunks, butter, and brown sugar. Hand-pressed dough bakes to crispy edges. Simple ingredients, serious flavor.
Prep:
7 min
Cook:
12 min
Total:
19 min
Servings:
4 servings
Slide a cast iron skillet in the oven. Butter and brown sugar go straight into the pan — no bowl, no waiting. This is what a cookie in a cast iron skillet actually looks like when someone who cooks just makes it happen.
Why You’ll Love This Cast Iron Cookie
Warm chocolate melts on your tongue before it even cools. Takes 19 minutes total — 7 to prep, 12 in the oven, and you’re eating dessert that tastes homemade without the fuss of individual cookies. One skillet means one thing to wash. The edges get crispy while the center stays soft, that specific texture you can’t get in a regular baking pan. Works cold the next day, maybe better. Comfort food that’s actually fast. And the chocolate chunks don’t disappear into dough — they stay chunky, visible, doing their job.
What You Need for a Skillet Cookie in Cast Iron
Unsalted butter. A whole stick, softened. Coconut oil works if you want something nuttier. Both sugars matter — granulated and brown together. Skip one and the texture flattens. One egg. A flax egg if you’re vegan, though the moisture isn’t quite the same. Vanilla, but only if it smells alive. Dead vanilla does nothing.
Flour — a little more than you’d think. One and a third cups. The extra bit changes how it holds together. Baking soda. Fresh. Old soda is the silent killer of cookies. Sea salt, fine grain. The pinch matters. And chocolate chunks, not chips. Chop them if they’re too uniform. Semi-sweet or bittersweet. Bittersweet hits harder if you don’t want sugar-forward chocolate.
How to Make a Cast Iron Cookie Skillet
Heat the oven to 335°F. Not 350. The lower heat lets the edges go golden without the center staying raw. This is the thing nobody mentions but it changes everything. Grab a six-inch cast iron skillet or a nine-inch if you’re cooking for more people. Spray or butter the inside — make sure the bottom’s oily. Dry pan traps heat wrong.
Soft butter and both sugars go into a big bowl. Cream them with a wooden spoon or a paddle if you have one. No mixer. Push them together until pale, fluffy. You’ll see tiny air pockets. It takes longer than you think it should. Maybe five minutes. Worth it. Hardened butter chunks stall the whole thing.
Crack the egg in. Add vanilla. Mix it. The egg binds everything. Vanilla wakes up the chocolate. You could skip vanilla and still have a cookie, but it tastes flatter.
Whisk the flour, baking soda, and salt in a separate bowl. This step levels out the leavening. Fold the dry stuff into the wet slowly. Don’t overbeat. Patches of flour dust are fine. Lumps are not. You want it barely mixed.
Fold in the chocolate chunks by hand. This is where you feel the dough. Heavy, dense, chocolate scattered through it.
How to Get the Texture Right on a Cast Iron Cookie
Wet your fingers. The dough’s sticky and doesn’t want to move. Press it into the skillet. Make it rough, uneven. Don’t flatten obsessively. Thickness changes how long it bakes.
Slide into the oven. Watch for edges going golden, the surface starting to crackle slightly. Could take 10 minutes. Could take 13, depending on the pan and your oven. The smell turns nutty, caramel-like. Peek a couple times if you need to. Insert a toothpick near the edge. Moist crumbs clinging is right. Dough strings mean underbaked. Totally dry means you pulled it too late.
The skillet stays hot. Cooling takes 3 to 5 minutes before you slice or scoop. The texture firms up during this time. This is where people mistake soft for underdone. It’s not. The heat keeps cooking even after it’s out. Wait.
Cast Iron Cookie Tips and What Goes Wrong
Overheated oven burns the edges while the center’s still raw. Lower temp helps. Mistake the buttery, soft texture for underbaking — that’s the second mistake. Always test with a toothpick. Cool it first. Then judge.
I usually hit it with flaky salt right out of the oven. Cuts the richness, wakes up the chocolate. Small thing. Changes the whole thing.
Brown sugar swaps for maple or coconut sugar work, but expect darker color and earthier taste. Baking soda has to be fresh. Old soda kills both the rise and the browning. Check the date.
Best eaten warm. Leftovers chill fine but lose the crispy edge. Reheat lightly in the skillet or oven to bring it back.
Cookie In Iron Skillet With Chocolate Chips
Prep:
7 min
Cook:
12 min
Total:
19 min
Servings:
4 servings
Ingredients
- 1 stick unsalted butter softened (swap for coconut oil in same quantity for nutty twist)
- ½ cup granulated sugar altered to ¾ cup for slightly sweeter edge
- ½ cup packed light brown sugar
- 1 large egg (replace with flax egg for vegan option)
- 1 teaspoon vanilla extract
- 1 ⅓ cups all-purpose flour (increase from 1 ¼ cups for texture)
- ½ teaspoon baking soda
- ¼ teaspoon fine sea salt
- 1 cup semi-sweet chocolate chunks (use chopped bittersweet chocolate for more intense flavor)
Method
- ====
- 1 Heat oven to 335°F—not 350° for better gentle heat; less risk burning edges before center cooks through. Prep 4 six-inch cast irons or 2 nine-inch skillets with oil spray or softened butter rubbed on inside edges. Dry surface traps heat unevenly.
- ====
- 2 Soft butter and sugars go in big bowl. Cream with sturdy wooden spoon or paddle attachment until fluff lifts, pale color and tiny air pockets show. No electric mixer? Hardened butter chunks stall creaming. Patience beats force.
- ====
- 3 Mix egg and vanilla next. Egg binds, vanilla wakes up dough. Can skip if unsure vanilla quality; cookie loses personality but stays functional.
- ====
- 4 Whisk flour, soda, salt in separate bowl—dry trio evens leavening and flavor balance. Gradually fold dry mix into wet ingredients. Avoid full mixing; patches of flour dust fine but no lumps.
- ====
- 5 Fold in chocolate chunks with hand. Chopping enhances melty pockets, not uniform chips. Chunk size matters; big clumps weigh dough unevenly.
- ====
- 6 Divide dough roughly equally. Wet fingers liberate sticky, dense dough pressing into skillets. Pat rough, slightly uneven surface. Don’t flatten obsessively. Thickness determines bake time.
- ====
- 7 Slide into oven. Watch edges golden and rise puff slightly, surface crackles quietly. 10-13 minutes at 335°F usual for small skillets. Bigger pans lean towards 14-16 mins. Smell nutty caramel, peek occasionally. Insert toothpick; moist crumbs cling but no dough strings. Too dry? Pull faster. Undercooked feels doughy when pressed gently.
- ====
- 8 Cooling off cast iron is hot hazard. Pastry firming up silently. Let sit 3-5 minutes before slicing or scooping. Texture shifts from molten to chew-ready.
- ====
- 9 Post-bake tipping: I usually add a pinch of flaky salt right after oven. It cuts richness, wakes the chocolate pockets.
- ====
- 10 Common slipups: overheated oven scorches edges fast, leaving center raw. Mistake the buttery texture for underbaking; cooling is key, always test toothpick for real doneness.
- ====
- 11 Substitutions: brown sugar can be swapped with maple sugar or coconut sugar but expect darker color, earthier sweetness. Baking soda must be fresh; old soda kills rise and browning.
- ====
- 12 Storage tip: best eaten warm. Leftovers chilled keep well but lose edge crispness; reheat lightly in skillet or oven to revive.
- ====
- 13 If no cast iron, heavy oven-safe dish or muffin tin works, but omit cooking spray and grease with butter only to avoid chemical taste.
Nutritional information
Calories
340
Protein
3g
Carbs
42g
Fat
18g
Frequently Asked Questions About Cast Iron Chocolate Chip Cookie
Can I use a different size pan? Nine-inch skillet takes longer — 14 to 16 minutes instead of 10 to 13. Six-inch is faster. Muffin tins work too but change the texture entirely. Wider and thinner bakes different.
What if I don’t have cast iron? Heavy oven-safe dish works. Don’t use cooking spray — it tastes chemical. Butter only. Regular baking pans lose the edge-crispy thing that makes this worth doing.
Can I make this vegan? Flax egg replaces the regular egg. One tablespoon ground flax mixed with three tablespoons water. Sit for five minutes. The moisture isn’t identical, so the texture shifts slightly. Still works.
How do I know when it’s actually done? Toothpick in the center. Moist crumbs clinging means done. Wet dough string means raw. Smell matters too — should smell like caramel and chocolate, not raw dough. The edges pull away from the pan slightly when it’s ready.
Why 335°F instead of 350? Gentler heat means edges brown without the center staying doughy. Higher temp rushes the bake. Edges burn, center’s raw. This works.
Can I bake it ahead? You could. Tastes better warm. Cold it’s fine but loses something. Reheat and it comes back.
You’ll Love These Too
Explore all →
Slow Cooker Pork Tenderloin in Chianti
Chicken Bacon Ranch Pasta Recipe
Easy Beef Wellington with Mushroom Duxelles
Crispy Baked Potato Skins with Bacon & Cheddar
Mini Crab Sliders with Sriracha Mayo
Homemade Soft Pretzels with Honey & Baking Soda
Cured Salmon with Calvados & Juniper
No Bake Cheesecake with Strawberries
Shrimp Scampi with Garlic, Fennel & Tomatoes

Long Island Iced Tea Recipe with Mezcal
Avocado Tuna Salad No Mayo Recipe
Ziti Bake with Feta and Cherry Tomatoes

Asian Chicken Sandwich with Peanut Carrot Salad

Beef Enchilada Recipe with Green Chile

Grilled Chipotle Tofu Sandwiches with Lime Mayo
Ground Beef Tacos with Chili Powder & Cumin
Strawberry Cake with Cream Cheese Frosting
Cajun Chicken Pasta with Creamy Sauce
Glazed Carrots with Maple Syrup & Brown Sugar