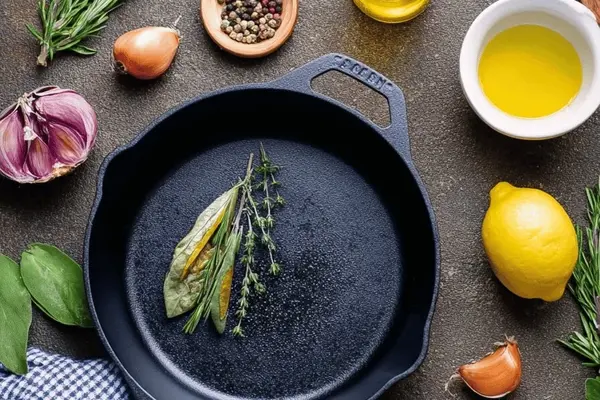
Seasoned Cast Iron Skillet with Grapeseed Oil
By Emma
Certified Culinary Professional
·
Recipe tested & approved
Season cast iron skillet using grapeseed oil baked upside down. Build durable non-stick patina with simple maintenance and gentle cleaning for lasting results.
Prep:
15 min
Cook:
1h 5min
Total:
1h 20min
Servings:
1 skillet
Pour just a teaspoon of oil on the skillet—grapeseed, avocado, something that smokes high. Too much kills it. Heat the oven to 360. Upside down on the rack. Lower shelf catches drips with foil. Sixty-five minutes. That’s the whole thing.
Why You’ll Love This Cast Iron Seasoning Method
Builds a finish that actually holds. Not patchy. Not sticky. Takes 1 hour 20 minutes total, but most of that’s the oven running while you do other things. Fifteen minutes of work, then walk away. Works on new skillets, old ones, pans that flaked. Seasoning cast iron cookware this way—you’re not fighting the metal, you’re working with it. The oil bonds instead of just sitting on top like a wet shine. That’s the difference between a skillet that lasts and one that strips every time you cook. Grapeseed oil for seasoning cast iron goes further than you’d think. One bottle handles dozens of seasoning rounds.
What You Need for Seasoning Cast Iron
One cast iron skillet or whatever piece needs work. Lodge cast iron utensils, vintage finds, doesn’t matter. Size doesn’t change the method.
Grapeseed or avocado oil—that’s the oil for cast iron pan seasoning that actually sticks. Olive oil breaks down too fast. Vegetable oil leaves a gummy buildup. Grapeseed works. Avocado works. Pick one and stick with it.
Two tablespoons total. Sounds like nothing. That’s intentional. You’re using maybe a teaspoon per coat—barely visible sheen, then you wipe again. More oil just turns sticky and flakes off once it cools.
Aluminum foil for the lower oven shelf. Catches the drips. Prevents seasoning your oven instead of your pan.
Paper towels. Not cloth. Cloth leaves lint in the seasoning and that shows when you cook.
Warm water and mild soap. Yes, soap. Only this once. Strips old buildup that won’t bond with new seasoning anyway.
A stiff brush. Natural bristle works. Metal bristle works better. You’re scrubbing out years of stuck residue.
How to Clean a Cast Iron Skillet Before Seasoning
Start with warm water and soap. Use more soap than usual because you’re stripping, not maintaining. This breaks every rule of cast iron care, but it matters here.
Scrub with a stiff brush. Get into the handle, the sides, the bottom. Residue that’s been there for months won’t take off easy. Push.
Rinse completely. Any soap left = flaking seasoning later. Run it under running water until the water comes out clear and neutral-smelling.
Dry it with a towel. Then—this is the key—place it on a stovetop burner on medium heat for 2 minutes. Gets rid of the moisture towels leave behind. Moisture invites rust and stops oil from bonding.
Let it cool just slightly. Hot skillet takes oil better. Warm, not steaming.
How to Season Cast Iron Pan in the Oven
Heat the oven to 360 degrees. Slightly higher than usual gives better oil bonding. Watch for smoke though—not dangerous, just smoke.
Pour a teaspoon of grapeseed oil inside the skillet. Coat the entire surface. Then another teaspoon on the outside, the handle, the bottom. Every part.
Wipe it. Then wipe again. The skillet should look almost dry but slightly glossy. Most of the oil comes off—you’re not baking an oily pan, you’re baking a nearly-dry one with oil molecules in the metal.
Place the skillet upside down on the center oven rack. Upside down matters because drips run toward the opening, not the cooking surface.
Lay aluminum foil on the rack below. Not directly under—one shelf down. Catches the drips. Prevents a smoke disaster and seasoning splatter inside your oven.
Bake for 65 minutes. You’ll hear a faint crackle or sizzle around the 30-minute mark. That’s the oil polymerizing, bonding to the cast iron. Around 45 minutes, the smell shifts—goes from raw oil to something deeper, toasted, almost nutty. Keep watching but don’t open the door. Temperature drops every time you do.
The entire process: heat takes about 10 minutes, the baking takes 65. Total oven time is 1 hour 5 minutes.
Cast Iron Seasoning Oil Bonding and Cooling
Turn the oven off. Leave the skillet inside.
This is where people rush and ruin it. Don’t pull it out hot. The seasoning needs time to stabilize as it cools. Temperature drop too fast = uneven coating, weak spots.
Let it sit until it’s completely cool to the touch. Could be 45 minutes. Could be an hour. Not a problem. Just leave it.
Remove the skillet. It’ll look darker than when you put it in. Not glossy-dark, just deeper. That’s the seasoning layer.
Apply one more whisper-thin coat of oil with a clean paper towel. Just a film. Wipe it thoroughly so it looks almost dry again.
This second coat fills in any spots the first coat missed. Seasoning works in layers—each coat bonds, then you add another. One coat isn’t enough for real durability. Two is the start.
Store the skillet in a dry spot with airflow. Don’t stack other pans on it. Don’t leave it near a sink. Avoid damp surfaces. Moisture creeps into microflaws and starts rust, then the seasoning flakes.
Cast Iron Pan Seasoning Tips and What Kills It
Buildup gets sticky or patchy sometimes. That’s old seasoning breaking down or too much oil trapped underneath. Sand it gently with very fine steel wool. Not rough. Very fine. Then run through the oil and oven process again—65 minutes at 360.
Don’t drench the skillet in oil hoping to build seasoning faster. The opposite happens. Too much oil bakes into a gummy layer that flakes when you cook. Light touch. Barely visible. Wipe after you think you’re done, then wipe once more.
You’ll see the seasoning darken over cooking time too. That’s normal. Cooking oil bonds on top of your baked seasoning. That’s how cast iron gets better with age—each meal adds to it.
Some people say never use soap on cast iron. Strip it once with soap when you’re seasoning. After that, hot water and a brush is enough because you’re maintaining, not rebuilding.
Grapeseed oil for cast iron pan seasoning is consistent. Avocado works too. Some people swear by flaxseed oil but it flakes easier. Stick with grapeseed or avocado and you’ll see results that hold.
Seasoned Cast Iron Skillet with Grapeseed Oil
Prep:
15 min
Cook:
1h 5min
Total:
1h 20min
Servings:
1 skillet
Ingredients
- 1 cast iron skillet or cookware piece
- 2 tablespoons grapeseed or avocado oil
- aluminum foil for drip catch
Method
- ===
- 1 Heat oven to 360 degrees Fahrenheit. Slightly higher than usual, gives better oil bonding but watch smoke.
- ===
- 2 Use warm water and mild soap once, scrub with stiff brush. Normally skip soap except now to strip old build-ups. Rinse.
- 3 Dry skillet thoroughly, use towel then heat on stovetop briefly to remove dampness. Moisture invites rust fast.
- ===
- 4 Pour just a teaspoon oil inside and outside of skillet. Too much oil equals sticky, blot excess with a paper towel that doesn’t leave lint. Handle too—don’t forget.
- ===
- 5 Place skillet upside down on oven rack center. Lay foil on lower shelf to catch any oil drips, prevents smoke disaster.
- 6 Bake about 65 minutes. Watch for faint smokiness and smell deepening nutty oil. This signals bonding happening. Oven heat polymerizes oil on metal.
- ===
- 7 Turn oven off, leave skillet inside until fully cooled to room temp. Don’t rush cooling—allows seasoning to stabilize. Remove gently.
- 8 Once cool, apply another whisper-thin film of oil all over with clean paper towel. Wipe thoroughly.
- 9 Store skillet in dry, ventilated spot. Avoid stacking or damp surfaces which invite rust and flaking seasoning.
- ===
- 10 If buildup looks sticky or patchy, sand gently with very fine steel wool and repeat oil thin layers baked longer at slightly higher temps. Seasoning needs respect—layers build slowly.
- 11 Resist over-oiling from the start—the temptation to drench kills the finish. Light touch wins.
- 12 Invest some patience not just time. You’ll hear the faint crackle or sizzle while baking, smells glowing toasted oil. That’s progress.
- ===
Nutritional information
Calories
120
Protein
0g
Carbs
0g
Fat
14g
Frequently Asked Questions About Seasoning Cast Iron Cookware
Can I use olive oil to season cast iron? No. It breaks down too fast. Smokes at lower temps. Leaves a sticky residue that flakes once you cook on it.
How often should I season a cast iron skillet? Once a year if you cook with it regularly. More often if it’s showing bare spots or rust. The cooking itself adds seasoning. You’re just rebuilding when needed.
What if my skillet is really old and rusty? Same method. The rust acts like flaky buildup. Sand it with steel wool first, get it to bare metal or close, then season normally. Takes patience.
Can I use the skillet right after seasoning, or do I have to wait? Wait until it’s cool. You can cook on it the next day. First few uses, the seasoning feels delicate. By the fifth or sixth cook, it’ll feel solid.
Is 360 degrees important, or can I use a different temperature? 360 works because it’s hot enough to polymerize oil without smoking excessively. Higher temps bond faster but smoke more. Lower temps take longer. Stick with 360 unless you’re experienced with cast iron seasoning oil bonding at different temperatures.
What’s the difference between cleaning a cast iron pan and seasoning it? Cleaning removes food. Seasoning builds the protective layer. Once you’ve seasoned it, cleaning a cast iron skillet means hot water and a brush—no soap, no abrasion. Seasoning only happens in the oven with heat and oil.
Can I season cast iron in a regular oven, or does it need a special one? Regular oven works fine. Standard home oven is all you need.
What if oil drips all over the oven? That’s why the foil goes on the lower shelf. But if drips happen, they bake on at 360 and come off once the oven cools. Not a disaster. Foil just prevents it.
You’ll Love These Too
Explore all →
Instant Pot Pot Roast with Ginger & Lemongrass
Pavlova With Raspberries and Almond Crumble

No Bake Donut Cake with Mascarpone Cream

Homemade Strawberry Syrup with Honey
Chipotle Mayo Recipe with Lime & Cilantro
Roasted Pork Filets with Cashew Curry Sauce
Slow Cooker Beef Tips with Mushrooms & Rice

Blueberry Cheesecake Cookies
Herbed Spicy Olive Dip with Fresh Garlic
Maple Pudding Cake with Cream Sauce
Mushroom Swiss Burger with Cremini & Dijon
Beef Stew Recipe with Red Wine & Root Vegetables
Tofu Marinade Sandwich with Avocado

Lactose-Free Strawberry Ice Cream with Coconut
Pasta Tomato Sauce Tuna with Capers

Oven Risotto with Leeks, Spinach & Ricotta
Creamy Spinach and Artichoke Pasta
Roasted Carrots Lentil Couscous with Halloumi
Baked Cheese with Mushroom Sauté & Mustard